Mood:
Topic: The Kreative Kat
I have been trying to un-clog a clogged bathtub drain, but the drain is too small to take a wire snake. I was thinking about this as I fell asleep and then I dreamed of real living snakes writhing out of the overflow drain on the back of the tub. Oh yeah! I can snake the drain through that! There's a couple of screws on it and the snake fits quite well down the overflow. I think I dislodged something, although what it might have been is unknown. I didn't pull it out for analysis, it just schlupped down the drain making a weird schlooping noise.
The rest of this entry is an answer to a few questions that I have been asked in a few places. "Is it possible to alter the rise and fit of jeans through the crotch and thigh seam?" and "How do I change an ordinary jeans into skinny jeans? Can I sew them or alter them somehow?" and "what is about those Chuck Norris Jean with the secret action gusset that makes them superior for kicking the crap out of people?"
How to Turn Ordinary Jeans Into Skinny Jeans.
It's isn't difficult to turn ordinary or flare leg jeans to the current skinny jeans look. You must start with jeans the fit snugly through the waist, hip and seat, and to a lesser extent -the thigh. You can't turn oversize baggy jeans into skinny jeans. Altering the waist is an advanced level alteration that is best left to pros.
- Begin by turning your jeans inside out and trying them on. Mark with chalk where the fabric stops hugging the leg on the thigh. this is where the alteration begins. Mark a line across the knee line. Mark how skinny you want the jean to be at the knee. Finally, mark with chalk how skinny you want them to be at the hem. Pin the jeans together on these marks and take off the jeans. Be sure that you can get your foot through the new skinny opening!
- Rip out the seams on both the inseam and outseam from the top mark down to the hem.
- Lay the ripped out pants flat on a table, front facing up. Draw guidelines across the knee and the ankle. Draw a guideline up and down the leg in the very center on each leg. There needs to be the same amount of fabric on both sides of this line. This center leg line is very important, it keeps the altered pant legs from twisting.
- Flip the pants over and repeat to the backside of the legs. You will notice that the back leg is wider than the front, this is because the back thigh is larger than the front.
- Turn to the front: Measure the marked width of alteration across the knee. Mark one half this toward the inseam and half to the outseam. The measurement needs to be evenly divided across the leg using the center line as the center. Even if you pinned it so it was unbalanced, balance this line now. If you don't. the pants will twist on the leg
- repeat this at the ankle. Again, be sure the amount is divided evenly on both sides of the centerline
- repeat this step on the back. The center line of the back will appear to angle to the center back seam. This is correct, this angled seam makes a dart which gives jeans their booty hugging ability. Be sure that the new seam line is equidistant on both the inseam and outseam sides of the centerline.
- join the marks, from the thigh/hip to the knee to the ankle on the inseam and outseam, front and back. Pin the fronts and back together and sew the seams.
- Try on to ensure that the jeans fit. if you want you can take them in or let them out a bit, being sure that the seam are balanced on both sides.
- When you are satisfied with the fit, cut the seam allowance down to 5/8 of an inch. Overcast the raw edge using a serger (best) or a zig zag stitch. press the outseam to the back, press the inseam to the front.
- Optional: top-stitch the seam allowances down using special gold jeans top stitch thread.
Below is an illustration of the guidelines
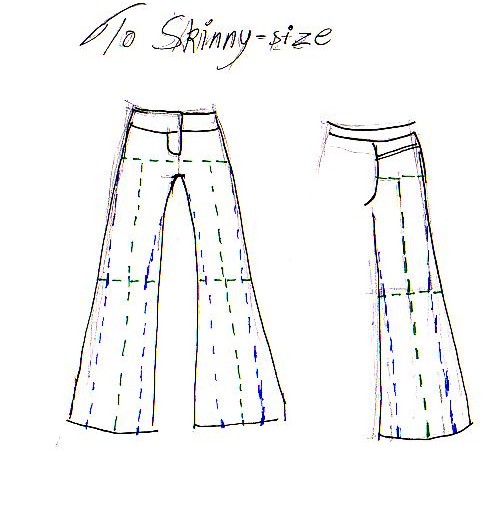
The green lines are the guidelines, the blue lines are the new seam lines. It's not very difficult, it requires a bit of time and patience to try the pants on and fine tune the fit. Remember to keep the back a bit wider than the front, keep the alteration balanced on each side of the center guideline, and don't make them so tight at the ankle that you can't get the pants on and off.
but wait, there's more:
Edit on October 8, 2009. Wow. Over two thousand people have looked at this entry since I embedded a counter on it. The number one question I have recieved is "Do I have to take in both the in seam and out seam? Why can't I take in only one seam? It's easier! Does it really make a difference?" Actually it makes a huge difference and if you take in only the outseam you will have wrecked you jeans. Take a look at the update entry here for the reasons why you shouldn't take in one seam only and the concequesnces if you do
How To Alter The Rise of Jeans
This is a bit more difficult. The jeans must have some extra room in the seat and thighs to accommodate the alteration. You need to trim away excess fabric carefully. Too much left in the same allowances can cause "camel toe" Too little and the seam can split.
to lower the rise and turn them into hip huggers: You must take apart the jeans from the bottom of the fly on the front to where the yoke is sewn at the back. Turn the pants inside out. On the front, draw a guideline across at the crotch. measure up from the crotch the amount you want to remove from the rise. you can go up an inch and a half at most, this will remove about 3/4 inch from the thigh. Do the same on the back. To draw a new seam, you need to trace the old seam curve and use it for the new one. Also you can use a flexible ruler and measure against your body. This will give the ideal curve. You will need to repeat this for the back curve.
Be sure that the front curve retains its shallower J shape while the back keeps its deeper L shape. The L allows the fabric to curve over the cheeks. The following illustration will show the alteration you will make:
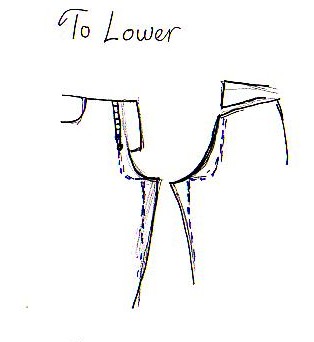
As you can see, a wedge is take out of the thigh in this alteration, back and front. This isn't too big a problem, but the jeans won't have as much stride room in them. they won't be as comfortable for those high karate kicks. This alteration can be difficult and can wreck the fit of you jeans. Don't attempt this one if your pants are tight.
This shortening the rise alteration can take care of the droopy frowny crotch fit problem. The vulgar term used on What not to wear is "depends diaper room" If you have no need for depends, then eliminate this excess bagginess. This fit problem is often found in store purchased pants when the size is good in the waist but a bit large in the seat and thigh. This alteration will make the pants fit better in the hip, thigh and seat.
Making the rise longer and higher is far easier. It does shorten the jeans somewhat, but it doesn't take away from the thigh. All you need to do is trace the front and the back curve down lower on the thigh from it's original spot. The illustration is quite self explanatory, it shows how the crotch is scooped out and lowered.

The blue line is the new seamline. It should meet up with the bottom of the fly and the bottom of the back yoke. In this alteration it is extremely important to cut away the excess fabric and overcast the raw edges.
The raised rise alteration is also the alteration required to eliminate the "Camel Toe" and the "wedgie up the butt crack" fit problems. It's quite easy to scoop out the crotch and make you pants fit perfect, whether they are store bought or if you sew your own.
The Hidden Diamond Action Gusset.
When this was added to pants in the early seventies this was quite radical. It was a selling point of the "Chuck Norris Action Jeans." Chris Sims of The Invincible Super Blog waxed poetic about these jeans a while ago. These miraculous jeans allowed Chuck to kick the crap out of the bad guys thanks to the hidden diamond gusset found only in these extra groovy action jeans developed by Chuck Norris himself. These babies had a special diamond shaped gusset added to the crotch and thigh seam so anyone can kick the crap out of the bad guys and not rip you pants, bind your balls or choke your thighs.
To see the diamond gusset crotch out there and in action, here's the Diamond Gusset Jeans Company. These are popular with real cowboys, the ones who live in Montana, Alberta, and places with real horses and cows. These pants are quite comfy when one is in the saddle riding the range or being tossed from the back of a bull or line dancing or any of those other things that cowboys enjoy. These jeans are also popular with motorcycle riders for obvious reasons and the company makes special motorcycle jeans with the diamond gusset and Kevlar to prevent road rash.
In reality the hidden diamond gusset is now in many pants and jeans, Chuck Norris developed or otherwise. The diamond was commonly added while drafting sports clothing and athletic clothing and found in many drafting books. It's very visible in the pinstripes of the New York Yankees pants, and it's also easy to see in football pants. Next time you watch a game with the Yankees, look at Derek Jeter's crotch as he slides into second the pinstripes are in the same diamond shape as the gusset. I know I always look at Jeter's crotch to admire the diamond shape of his pants.
The fit of athletic pants was so superior that it made its way into casual sportswear, jeans, now even dress pants have a different crotch cut than they did 40 years ago. The diamond gusset jeans above are better fitting because the obvious diamond in addition to the L curve adds even more room in the stride and the fork. In women's pants the back curve has always been the deeper L curve to accommodate the more curvaceous female backside.
According to an older men's wear patten book in my collection the older cut had a shallow J curve in the front and a J with a steep angle in the back. For sport's clothing wedges were added to the back thigh for extra room when swinging a golf club, cricket bat or a fishing rod. A newer book has both the older cut and the newer one with the familiar L curve in the back and a deeper J in the front. The picture caption says that the illustration was for student to compare the older fit versus the modern fit. Now most pants include the gusset as an integral part of the fit.
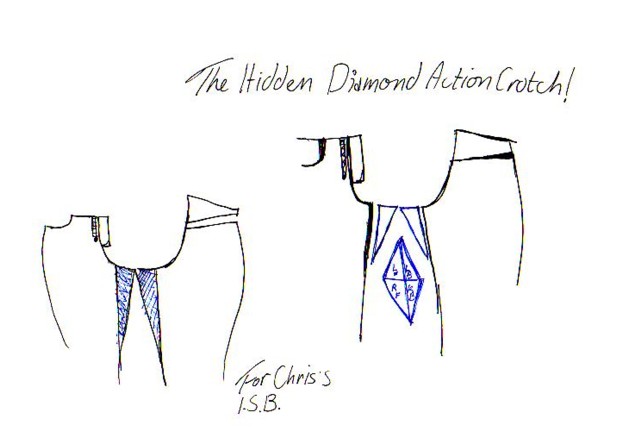
Here we can see the action gusset in action. The black lines on the right diagram are the original seam lines as pants were drafted in my old book. The blue diamond is the gusset. The blue lines inside the diamond divide the gusset. The picture on the left shows the gusset in shaded blue divided up between the front and back, left and right legs of the pants. If you need even more room, it's easy enough to add to the back thigh for even more high kicking action! It's quite simple if you understand how pants patterns are drafted and fitted to the body.
And that's all for today's introduction to the crotch. Please keep any comments or e-mails clean, this is mostly about sewing and pattern design after all.
