Several years ago I bought some wool worsted fabric in a small black and white hounds-tooth twill weave. The fabric had weight and body, but was too light for a jacket, and too heavy for a simple skirt. As I played with it I realized it had some interesting draping capabilities, especially along the diagonal bias grain. At that time I was quite intrigued by skirts, blouses and suits from the early twentieth century, especially from the time of the Titanic.
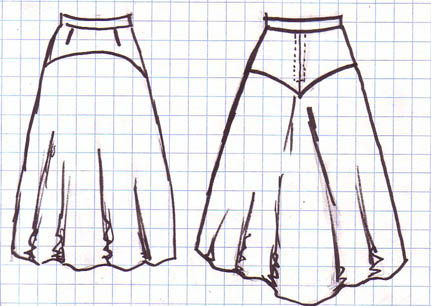
This skirt, which I call my "Titanic Skirt" is neither a reproduction of a historical pattern, nor is it entirely a mere modern interpretation of an old pattern, it is a hybrid between the two. First, it is inspired from several patterns, all of which would be worn by the passengers on the ill fated ship, The Titanic. The second and third class women would have all worn similar skirts, a bit above the ankle in length, close fitting at the waist and hips, flaring out near the hem to allow for freedom of movement. The high style and tight fitting "hobble skirts" of Paris and New York would have not been worn outside of first class, for the second and third lady, it was function over fashion.
Which doesn't mean they weren't attractive skirts. No, the skirts from the decade previous, the so-called Gilded age, were full, elegant and very wearable. Gone were the bustles and draperies in the backs, replaced with gathers and pleats. Gone were stiff metal hoops, replaced with stiffened crinolines. In some instances, judging from the dressmaking books of the time, the hems themselves would be stiffened, and according to the books, the need for the multiple layers of crinoline petticoats would have been negated. One stated proudly, "Just because your grandmother wore a starched petticoat doesn't mean you need to! With our modern new method of stiffening hems free yourself from all those petticoats!" The books tell how to stiffen using horsehair braids, glue sizing, fine wires, and whale bones. I think we, as modern women can dispense with the stiffened hems and the multiple petticoats!
The second inspiration is from photo in a modern fashion magazine, inspired by the movie, not the era. The photo is of a so-called "Early twentieth century gored skirt" It was by no means a gored skirt, having only side seams, no gores and a yoke. For a fashion pedantic, it is more properly referred to as a "Yoked" skirt. The name wasn't only thing awkward about the skirt in the picture. The yoke was only in the back, not the front. The front was cut on the bias, with strange off-bias side seams in an poorly draping A-line. The back had a too deep yoke which clung in an unflattering line to her butt, making it huge, and the small pleat at the center back seemed to cling to her legs. No self respecting woman of 1912 would ever wear such a poorly fitting scantily cut skirt such as that!
So I decided to research the patterns of the time, find out why the ladies of the movie looked elegant and the reproduction looked so sucky. The reproduction seemed to be very similar to a popular Butterick pattern circa 1907-1909, but heavily simplified. The date isn't marked on the pattern. But the drawing on the envelope is quite similar to the reproduction, with a few major differences.
There was yoke on both the front and the back. The front was cut with the side seams on grain, and the center front of the skirt on the bias. The back had a shallower yoke and the pleat hung down in a graceful drape, not a stiff fold. The yokes didn't meet at the side, the front was a straight line and ended above the back.
I found many patterns and period illustrations of similar skirts, all with the yoke and the deep back pleat. There were many ways of executing the idea back then.
I played with my own ideas, starting with one-quarter scales and then half scales. The front was quite simple and didn't allow for variations, so it was simple to draft and sew. The back was much more challenging. First, I made the front and back yokes line up at the side seam so they flow in one line from the front the the point in the back. As I played with the back skirt I discovered a few intriguing ways to add a fullness in the back, without the need to fold and stitch a pleat onto the point of the yoke. I found one way that seemed like it shouldn't work, but did. I tested the idea and finally came up with several variations in cutting and sewing that turn the back so the fullness is in an elegant drape, not folds.
With two active kids, I needed skirts that were dressy, versatile and allowed a great deal of freedom of movement. I couldn't wear tight things, not while chasing after children, yet I was tired of pants and jeans and the basic "mommy" wardrobe. The walking and sport skirts of that time period fit the bill for me, but I didn't want anything too costuming or anything that looked like I was lost in a time warp. So I made myself a comfortable and full skirt that I simply love. It looks elegant and distinctive, yet still modern and not at all dated.
Here is the pattern for the skirt that I made, and a couple variations on the same idea. I assume that you know how the difference between bias and straight grain. I assume you know how to sew, how to stay stitch, how to put in a zipper, how to interface and finish a waist band. This skirt isn't for a beginner, it requires knowledge of sewing and fitting. If you can sew well, and are at the point where you don't need someone to hold you hand every step of the way, you might want to try this pattern.
My skirt is of virgin worsted wool in a black and white houndstooth pattern from England. High quality wools with a good drape, body and weight make up the best, any fabric with similar qualities will work. Fabrics that have too much body and stiff hand won't drape and stick out from the body. Fabrics that are to heavy will be uncomfortable to wear. Softer fabrics will work --especially in the full circle variation, just interface or underline the yoke so it will hold the weight of the skirt without straining the grain. Here is the pattern for the skirt that I made.
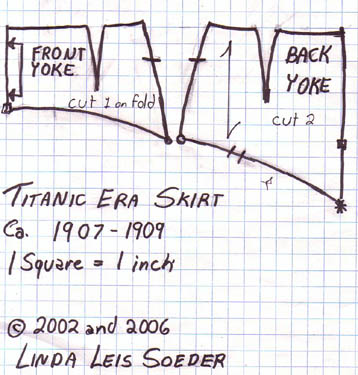
The diagrams are done on graph paper at a scale of square equaling one inch. The yokes are completely to scale. They are drafted to fit a waist of 30 inches and a hip of 40 inches, meaning me. The width of the skirt is to scale, but the length isn't. I am quite tall so mine are quite long, you will need to customize the length. When you draw them out, make the skirt's hem so that it's about three to four inches above the ankle, it hangs well and isn't so long that it drags on stairs or gets caught in escalators, the door of the subway, car doors, or any other modern safety hazards. The modern photo was mid calf, the old originals were an inch above the ankle. To make the yokes larger or smaller, make your grid larger or smaller than one inch squares.
I recommend making this skirt up in muslin or scrap cloth first. This way you can test the fit, the locations of the darts, and the overall length of the skirt. Be sure the yoke fits well as it is a focal point. The waist should fit on the waist, not above or below, and the waist band should not be any wider than one a quarter inch. Don't be afraid to use modern tools, materials and methods to make this skirt. It's meant to invoke the spirit of the past, not the construction frustration! Use fusible interfacings, nylon zippers, finish the seam allowances with your serger, it isn't for a historical re-enactment so it doesn't need to be a an authentic reproduction!
The front consists of two pieces: The yoke and the main skirt. The yoke is cut on the fabric fold, straight grain. The darts are at the three quarter line along the waist, close to the side seam, curved slightly to fit the contours of the body. The bottom of the yoke, where the curve starts, should be on the fullest part of the tummy to look the best. Any lower and it cups any bumps; too high and it outlines any bulges. The curve is shallow. Stay-stitch the curve of the yoke along the seam line. Don't stretch this line!
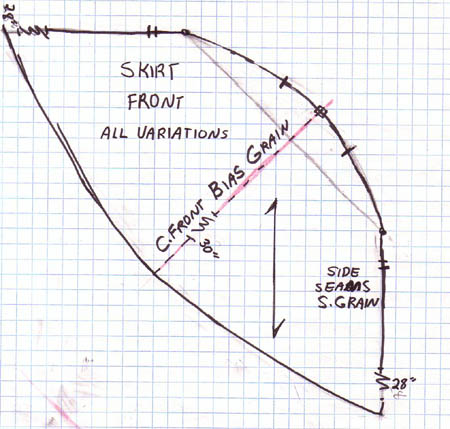
Not that the main skirt piece for the front doesn't look like a modern skirt front. The center front is on the bias grain and the side seams are on the straight grain. The piece is one quarter of a circle. Do not make it any fuller than the quarter circle I tried an half circle when testing the design and found it was far too full for modern life and stood out to far from the legs. The top should be curved the same as the yoke, the two should fit together perfectly with no easing. Easing will make the tummy look fat! Cut and sew the curve carefully, stay-stitching the yoke, clipping the curve and then pinning and sewing onto the skirt. Sew a curve as a curve, don't ever pull the seam into a straight line no matter what you have heard elsewhere! Because of the flexibility of the bias grain if you pull the seam straight you will stretch the carefully drawn curve shaping out of kilter and flatten the curve. Overcast or serge the two edges together. Press the seam up into the yoke. Top stitch if desired.
The back is also in two parts, Yoke and main skirt piece. The yoke is cut on the straight grain with a seam at the center back. A lapped or centered zipper is placed in the center back seam. It is not authentic to the era, but seriously, who needs the hassle of sewing a hook and eye placket? I'm quite certain a woman of the era would have used the zipper had it been widely available. The front and back yoke side seams should match at the side and curve down from there. Be sure that the yoke point is exactly on the fullest point of the butt. Any higher and the pleat open up and make your butt look huge. Any lower and gravity will pull the fullness between the legs and look and feel ugly. The darts are in the classic two thirds position. Draw and sew them as curves. On the diagram they drawn for someone who has a bit of "sway back" --that someone being me. Sew up the yoke first, inserting the zipper and pressing the seam below the zipper open.
This one is the simplest of the four. The yoke seam is cut at right angles and the side seams are also right angles. A small pleat forms because the bias grain is at the center back and gravity pulls it down. Sew the yoke and skirt together, press upward. Sew the side seams. The skirt is a half circle and is the most modern variation. It's also the easiest to sew and fit. It's quite comfortable, yet elegant and can be either casual, business like or anything in between! Back in the day it would be perfect for walking, traveling and golfing.
Cut from a single layer of fabric, paying close attention to the grain lines. Stay stitch the V and snip down to the stay stitching. Lay the skirt on the yoke stitch one side, lower the needle into the corner point, lift the presser foot, pivot, and finish the seam. Again, don't stretch or pull into a straight line. Because this is s major focal point, do it correctly and do it well. Overcast or serge both edges together and press upward.
This variation gives a much fuller back than front. The overall skirt is now a full circle. Back in the day this skirt would be recommended for sports, lawn games, hiking, golf and bicycling. As you can see from the diagram, this piece is quite large and cut on a single layer of fabric. If the fabric needs to be pieced to be large enough, the coloured lines show how approximately where to do it. There shouldn't be a center-back seam under any circumstances, it will look awful! Stay stitch along the entire seam line and then snip down to the corner point.
Sew this seam the same as before, but use a stay tape, ribbon or twill tape to reinforce the seam on the yoke side. There is little allowance near the pivot point and the re enforcing is needed so the tape is helping the fabric hold the weight of the skirt.
Sew the back yoke first and insert a zipper in the center back, it can be either centered, lapped or invisible, depending on your preference.
Sew the yokes to the main pieces first, as instructed above.
Next, sew the side seams together, matching the yoke seams. Press the seam open after serging or overcasting. If you want, side seam pockets can be sewn into the sides. I don't recommend patch pockets as they are too casual for this elegant skirt.
Sew on the waistband and use a button and buttonhole to close the waist band at the back.
Allow the skirt to hang a few days before hemming. This will allow the bias grains to stretch and sag. Put the skirt on and have someone help you pin the hem into place. I made mine so the back is two inches longer than the front, you might prefer an even hem. I serged the raw edge of the bottom, pressed the hem into place and hemmed by hand. A top stitched hem would also work, and many hems of the era were machine top stitched.
And that's all to making this simple and versatile skirt.