Tatting: Patterns and tips!
introduction to tatting
Tatting is not an ancient art form, nor is it particularly difficult. Its origins date back to the 1700's in France where it was originally called "Frivolitie." The English term "tatting" is believed to come from "tattered" referring to the tattered appearance of the earliest tatted laces. According to Beeton's Book of Needlework (1870)the ladies of France made many refinements in tatting techniques throughout the early part of the century and elevated it to what the Victorian lady would have called "art needlework." Its novelty and ease of working propelled tatting to the height of its popularity in the late eighteen hundreds.
After the art reached its peak in the 1890's it has waxed and waned in popularity over the years. Many women of the time saw it as an time saving alternative to needle lace and bobbin lace. By that point in time machine-made laces were readily available and widely used, yet there were still garments that required that extra handmade touch. Tatting fit the requirements of the modern Victorian woman, inexpensive, required little in the way of elaborate equipment and gave her yards of lace in hours, rather than days.
The tools haven't changed much from that time. The tools are simple enough: one or two shuttles and thread. That's it! And there only two hand movements required to form the only stitch used in tatting. The difficulty comes in learning the one little trick that forms the stitches, what I call the *ping* or *pop* as the stitch goes from one thread to the other. Once the *ping* is mastered, the rest is easy, requiring only a bit of practice before you can make many different tatted items.
My favourite type of tatting is edgings and insertions used to enhance clothing. I use both thick and thin threads, although thin lace threads are traditional. I'm not really much of a doily type of person so I've never made a tatted doily! Most of my edgings are variations of motifs that have been around a long time, some I got from old books, some I got by studying thrift shop garments. Most I changed to suit my taste. I'm not a big fan of tiny little picots everywhere, that's one of those things that has added to tatting's reputation of being difficult.
Tatting is often work alongside crochet and in often incorporated into crochet lace. Indeed, there is a bastard for of tatting called "cro-tat" I'm a tatting purist as far as technique is concerned, and cro-tat is a poor substitute for the real thing. I don't think much of needle tatting either. It can only form small motifs, you can't combine rings and chains, and you can only make rings the length of the needle. Much of the needle tatting I've seen, even done by the so-called experts appears coarse and uneven. It advertises itself as much easier than shuttle tatting, but shuttle tatting is not that difficult to learn once the basic stitch is mastered. The learning curve is not that steep, all it takes a little time and practice. There is nothing wrong with learning a skill that takes a little time.
Getting started
Equipment
The first piece of equipment you will need is a tatting shuttle. These are available in many craft stores, such as Michael's or at yarn stores. Check the needlework department of many department stores and they might have shuttles in with the knitting needles. Several on-line lace-making supply companies carry tatting shuttles.
My favourite type of shuttle is small, plastic and curved with a small hook on one end for drawing the thread through picots to make joins. Several of mine also have removable bobbins to hold thread, so I don't have to buy a bunch of shuttles to work on different projects. Plastic is easier on the hands than metal. I also have several from Germany with little metal crochet hooks integrated into the shuttle. Start with two shuttles. For most tatting, it's all you need.
Some old books mention metal rings, metal hooks, chains and other supplies. If you get a shuttle with an integrated hook, you don't need anything else. Antique shuttles are not better than modern shuttles. They aren't rustproof and many either have rusted or will rust. They are much heavier and many have nicks, burrs and snags in the metal that can catch the threads and break them. Working with an old shuttle won't make your tatting better, no one will know how old the shuttle was when they see the lace.
Next, you will need thread. Save the fine tatting thread for that special time when you really need that nervous breakdown and use number 5 crochet cotton. It's available everywhere. Some places sell number 2 cotton which is also suitable for beginners. I prefer the thicker thread for learning because it's easier to see the stitches, easier to see mistakes, easier to pull out mistakes and works up faster that fine threads. For the very first beginner works I recommend the knitting yarn "Grace" by Paton's. It's 100% cotton, soft slippery and works up very quickly. You'll have enough lace to make something in an hour, rather than a week. And it's much less frustrating than fine thread.
Once you've mastered the first steps you can switch to a finer thread. My favourite thread is "Opera" by Coats. It's very smooth, doesn't snag on itself comes in a wide variety of colours and weights, from 5 (the thickest,) all the way to 40 (the finest.) As I said, don't bother with 70 or finer unless you really enjoy the frustration.
A note about thread thicknesses (or gauge)...the bigger the number, the finer the thread. Think of it like a fraction: one half a pie is larger than one fifth of a pie, so number 2 is thicker than number 5. And, of course, one twentieth of a pie is smaller still, and one fortieth of a pie is even smaller, so number 20 is thicker than number forty. And crochet/tatting thread gauges don't match up with sewing threads or other lace threads. It's quite confusing.
First Practice Edging
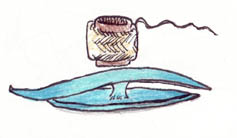
Our first tatting will be a simple one-shuttle edging. We will need to wind thread onto the shuttle or the bobbin if it has a separate bobbin. For this first edging use a 100% cotton knitting yarn. I used Paton's "Grace" in white. It will be easier to see what's happening as each stitch is formed. Wind firmly, but not too tight. Pop the bobbin into the shuttle leaving a six inch tail sticking out.
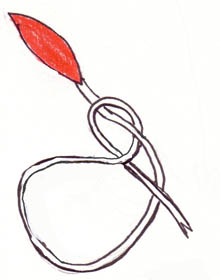
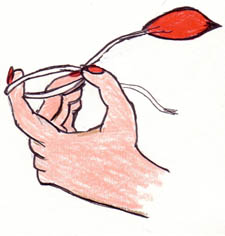 Now, make a loop with the thread tail and hold it in your non dominant hand. (Left for righties, right for lefties.) Hold the base of the loop with your thumb and forefinger and stretch it out with you middle finger, as shown in the illustration, figure 1. Some tatters get the ring finger involved, try it both ways and use whichever is comfortable for you.
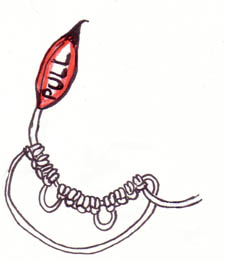
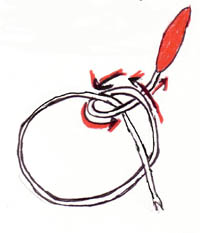 Next, pass the shuttle under the loop, around the loop and under the thread that passed under. See illustration and follow the path made by the arrows.
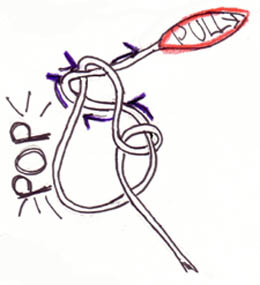
 Now comes the *ping* Pull on the loop with the middle finger and pull gently on the shuttle until the stitch goes from the shuttle thread to the loop thread. This will feel like a ping or a pop. Use the middle finger to pull the thread tight. Now pull the loop thread to make it bigger. Did it pull easily and become bigger? Congratulations! You've mastered step one! Didn't slide? Then your thread didn't pop from the shuttle to the loop thread. Try again! Look at the picture, it's the moment the knot passes, it looks like a knotty pretzel.
 This illustrates the stitch before it is tightened.
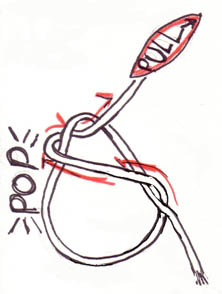
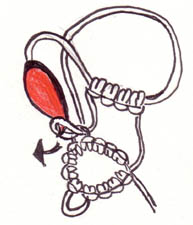
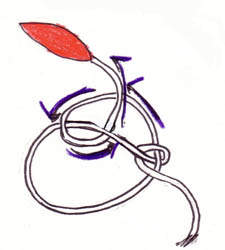 Step two is the opposite of step one. Pass the shuttle over the loop thread, into the middle of the loop, around and through the space of the loop and shuttle thread. Once again look at the picture and follow the path of the blue arrow.
 Pull with the middle finger and tug the shuttle gently and pop it from the shuttle thread to the loop thread. Figure six shows the knotty pretzel it will look like. Pull tight. You should have a stitch that looks something like the picture below.
That pop, when the stitch goes from the shuttle thread to the loop thread, is the process that stymies most beginners. Once the pop is mastered, the rest of tatting is simply a matter of counting stitches, spaces, picots, and joins. The two motion stitch makes one double stitch From here on when I say one stitch, I mean one double stitch. If I want a stitch made with only one hand motion, that's actually the little used half stitch and that will be the term I will use. (Just so we are clear on that!)
Make three more stitches, the first part with the shuttle going under, the second part with the shuttle going over, under, over...after a while the movement becomes natural and you won't need to think. You should now have four stitches on the ring. and from this point forward I will say the ring thread instead of the loop thread. All rings start with a loop, but once a stitch is made on it...it becomes a ring. The proper name for that loop is ring. Notice how the stitches look like little teeth? That's why lace is called Dentelle in modern French. Dentelle means teeth!

Next we'll make a picot. A picot is simply a space left in the ring, When the ring is pulled tight, the space becomes a little sticky-out loop. Picots add visual interest to tatting and they are used for joins. Begin to make your next stitch, but instead of crowding it against the previous stitch, leave a 4mm space. Finish the stitch as usual, without losing the space.
Make three more stitches another space(picot) and four more stitches. Now pull the thread so the ring gets smaller. Keep pulling until the there's no space between the first stitches and the last stitches. This is called closing the ring.

Do this when a patterns says "close" If your ring won't close, then your stitches didn't pop onto the ring thread. You might find a stitch on your ring that looks like this illustration.
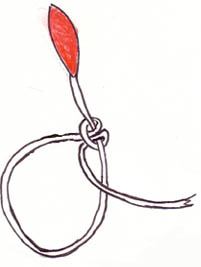
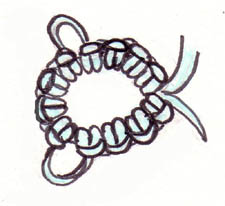 Now let's examine our ring. It should look like this illustration on the right.
If you get something like this next illustration: figure ten; it means you didn't keep the under over rhythm, you did too many under motion or too many over motions.
If your picots look like this: figure eleven; it means you didn't make all the spaces the same length. Don't worry, that comes with practice.
When I write this up as pattern it will look like this: 4-P-4-P-4-close. 4 is the number of stitches, P is for picot and close is for closing the ring.
 Now we'll do the second ring. Begin as before, with four stitches. Use the hook end of the shuttle to pull the ring thread trough one of the picots on the previous ring.
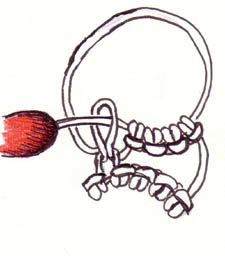 Pass the shuttle thread through this loop and pull tight. Make sure the ring thread still slides easily. That's known as a join. Now make 4 stitches, a picot and four stitches and close the ring. This is written as 4-join-4-p-4-close.
Now just repeat 4-join-4-p-4-close until you have the length you want, twenty-one is a good number. This will give you edging will curve into a circle and makes a nice little edge for a little coaster. (Pattern here)
One more practice edging!
One more simple edging, this one with a picot on top of the ring for visual interest. Start with a ring and make 3 stitches, one picot, three stitches. Make the next picot a bit larger that the first one. The three stitches, picot, 3 stitches, and close. Next ring.3 stitches, join, 3 stitches, picot, 3 stitches picot, three stitches, close. Repeat this ring.
The pattern notation for this is as follows R1:3-p-3-p-3-p-3,close R2:3-J-3-p-3-p-3,close. Repeat R2 for length of edging.
A simple Two Shuttle Edging.
Two shuttle edgings are denser and easier to sew on that one shuttle edgings. The second shuttle adds infinite variations to tatted lace. While one shuttle tatting works up exclusively into rings, two shuttle tatting adds another aspect, tatted chains. The stitches can also form on either the active thread or the passive thread, but don't worry about that for now, that's an advanced technique.
Fill two shuttles with thread. Know the two ends together. With one shuttle make this ring:4-p-4-p-4-p-4. --the same ring as before. Now without making a ring drape the one shuttle over you forefinger like so: and make 4 stitches with the second shuttle. This, forever more will be called the chain. now, make another ring: 4-join-4-p-4-p-4-close. Make a four stitch chain. repeat second ring and chain until you have the edging length you want! And that's it!
Another two shuttle edging
This is simply a variation on the previous edging. The only difference is that the chain is longer and has a picot in it. Ring one:4-P-4-P-4-P-4, close. *Chain:3-P-3 Ring 2:4-join-4-P-4-P-4, close. repeat from* until you have the length you want. The little picots in the chain are used to sew the edging onto the fabric.
Scallops
Scallops are rings that aren't pulled closed. It can be difficult for the beginner to give each scallop the same depth and shape. It takes practice. It's worth the time and effort to learn because some of my complex edgings are based on a foundation of scallops.
This scallop is quite basic. Use one shuttle. Start the same as a ring. 2-P-2-P-2-P-2-P-2-P-2 and start to close, but don't pull into a ring, pull it into the same shape as the picture. Next scallop: 2-join-2-p-2-p-2-p-2-p-2 pull into shape. Repeat this scallop. As you can see, this is not a very stable edging and is best used as a base for multi-row complex edgings.